Many people find the subjectivity of art to be frustrating, but that subjectivity is what makes art interesting. Banksy’s self-shredding art piece is a great example of this. The original painting sold at auction for $1.4 million — and then it shredded itself in front of everyone. That increased its value and the now-shredded piece, dubbed “Love Is in the Bin,” sold again at auction in 2021 for a record-breaking $23 million. In a similar vein to that infamous work, this robot destroys the artwork that it produces.
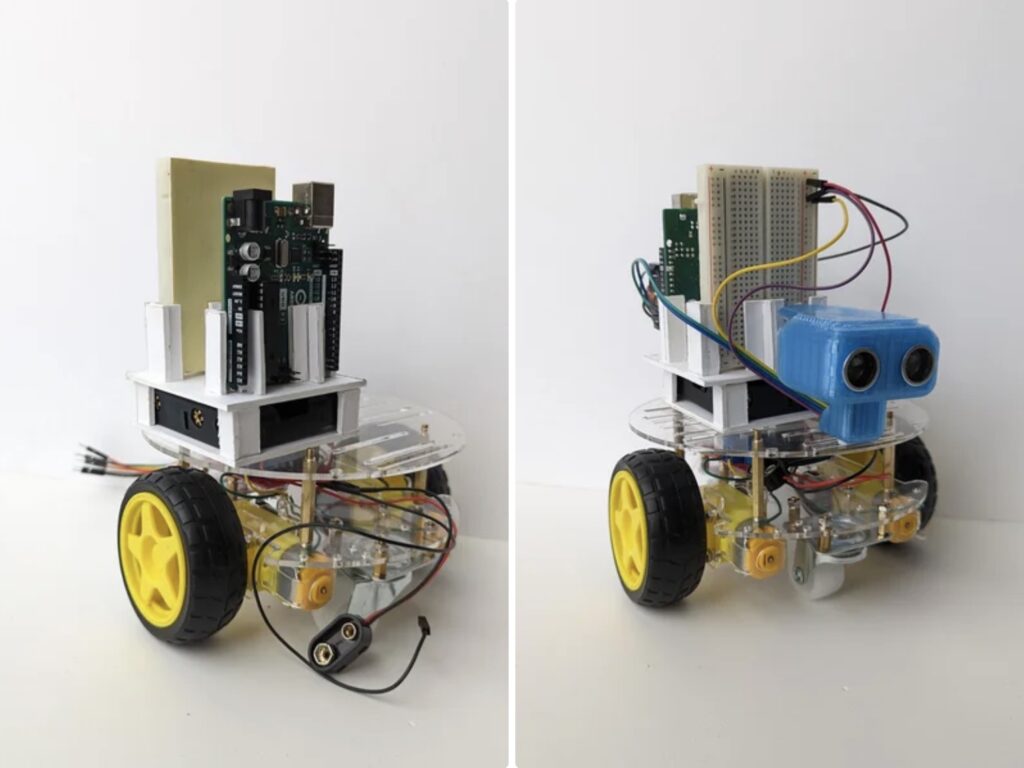
“The Whimsy Artist” is a small robot rover, like the kind you’d get in an educational STEM kit. It is the type of robot that most people start with, because it is very simple. It only needs two DC motors to drive around and it can detect obstacles using an ultrasonic distance sensor and has two infrared sensors for line-following. An Arduino Uno Rev3 board controls the operation of the two motors according to the information it receives from the sensors.
That decision-making is where the artistic elements come into play. When it doesn’t detect any obstacles, the robot will run in “creative” mode. It opens a chute on a dispenser to drop a trail of fine sand while it moves in a pleasant spiral pattern. But if it sees an obstacle with the ultrasonic sensor, it gets angry. In that mode, it reverses direction and uses the IR sensors to follow the line it just created while deploying a brush to ruin its own sandy artwork.
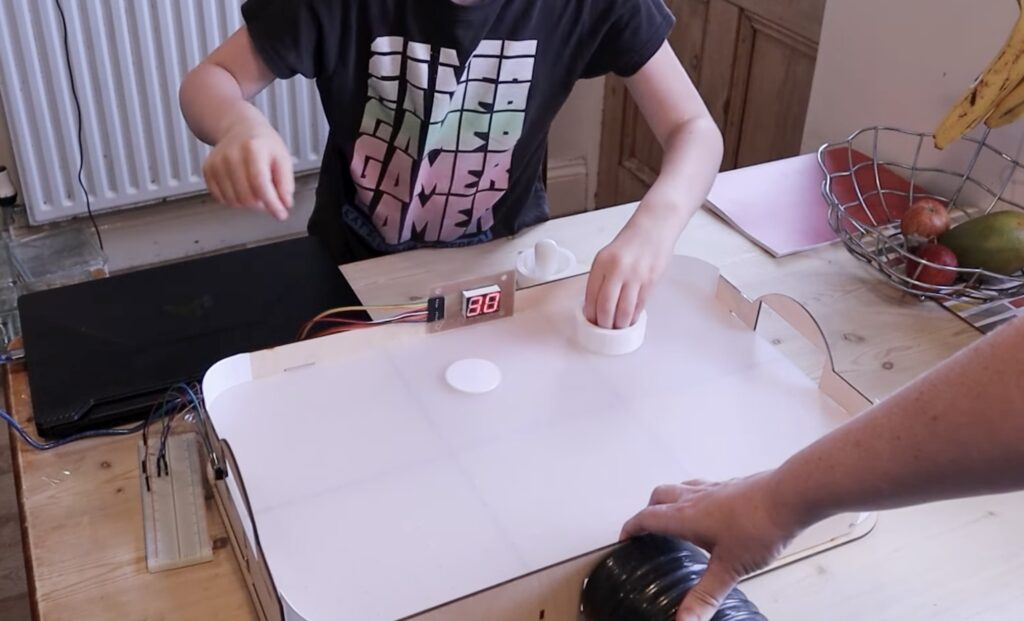
Inspired by game nights with her family, Lorraine Underwood from element14 Presents wanted to build a project that would be both fun and playable many times over. Based on these parameters, she opted to design and construct her own take on an air hockey table that would be capable of keeping score automatically.
The base of the air hockey table was made by first drawing a 2D model of the tabletop, complete with the myriad of holes for air to pass through and a zone at each end for scoring with the 3D printed puck. Below the top are four panels that comprise the four walls, with one having a slot for attaching a high-power fan. Extra rigidity was added by slotting in a grid of struts to buttress the rectangular layout and make it more impervious to accidental bumps or hits.
In terms of scoring, a player receives a point when their puck passes below the opponent’s goal, which meant Underwood needed some way of consistently detecting when the puck crosses the line. To do this, she created a small sketch for an Arduino Uno Rev3 that checked the state of a phototransistor and incremented the score when triggered. Although this worked initially, she did acknowledge that further improvements are needed to prevent false positives.
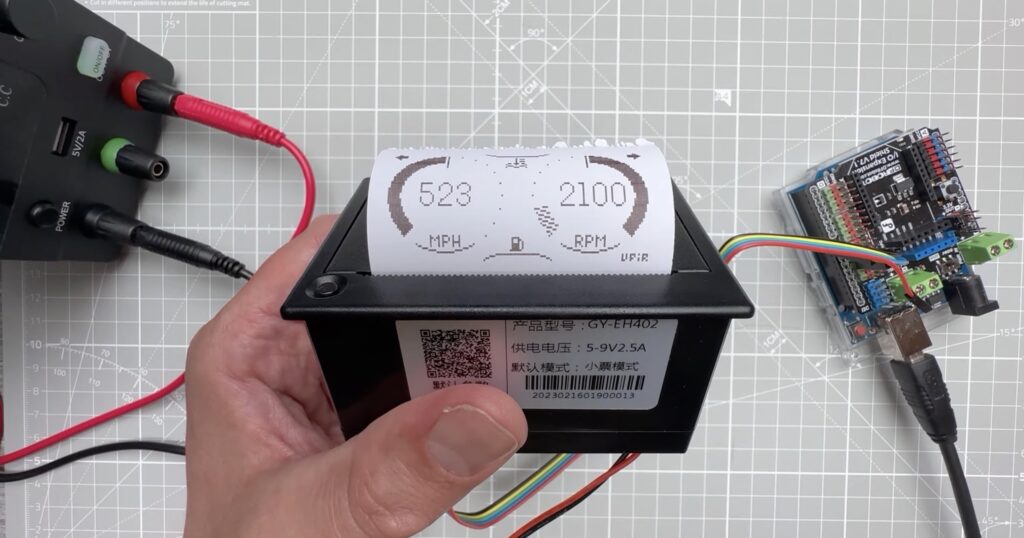
You would probably recognize a thermal printer as the thing that spits out receipts at a cash register. They offer a two key advantages: they do not require ink cartridges and they are compact. But because they print by applying heat to special paper that darkens when hot, they have low resolution and fidelity. If that’s a price you’re willing to pay for your next project, then Vaclav Krejci (AKA Upir on YouTube) has a great video tutorial that will show you how to control a thermal printer with your Arduino.
This model, a QR204, and most others like it, receive print content through an RS232 serial communications port. It has an internal microcontroller that lets it interpret what it receives over serial. If that is simple text, then it will print the text and move to the next line. But it also accepts commands in the form of special characters to modify the output, such as increasing the text size. It can also print low-resolution images sent in the form of bitmap arrays. Krejci explains how to do all of that in the video.
To follow along, you can use an Arduino Uno like Krejci or any other Arduino board. You only need to connect five jumper wires from the printer to the Arduino: ground, RX, TX, DTR, and NC. From there, all you need is a simple Sketch that sends serial output at 9600 baud through the pins you define. To print a line of text, use the standard Serial.println(“your text”) function. When you want to do something more complex, like print an image, Krejci has instructions on how to do so.
Many people (especially those with autism spectrum disorder) have difficulty communicating with others around them. That is always a challenge, but becomes particularly noticeable when one cannot convey their emotions through body language. If someone can’t show that they’re not in the mood to talk, that may lead to confusing interactions. To help people express their emotions, University of Stuttgart students Clara Blum and Mohammad Jafari came up with this wearable device that makes them obvious.
The aptly named Emotion Aid sits on the user’s shoulders like a small backpack. The prototype was designed to attach to a bra, but it could be tweaked to be worn by those who don’t use bras. It has two functions: detecting the user’s emotions and communicating those emotions. It uses an array of different sensors to detect biometric indicators, such as temperature, pulse, and sweat, to try and determine the user’s emotional state. It then conveys that emotional state to the surrounding world with an actuated fan-like apparatus.
An Arduino Uno Rev3 handles these functions. Input comes from a capacitive moisture sensor, a temperature sensor, and a pulse sensor. The Arduino actuates the fan mechanism using a small hobby servo motor. Power comes from a 9V battery. The assembly process is highly dependent on the way the device is to be worn, but the write-up illustrates how to attach the various sensors to a bra. There are many possible variations, so the creators of the Emotion Aid encourage people to experiment with the idea.
You can read more about the Emotion Aid, which was developed by Blum and Jafari as part of the University of Stuttgart’s ITECH master’s program, here on Instructables.
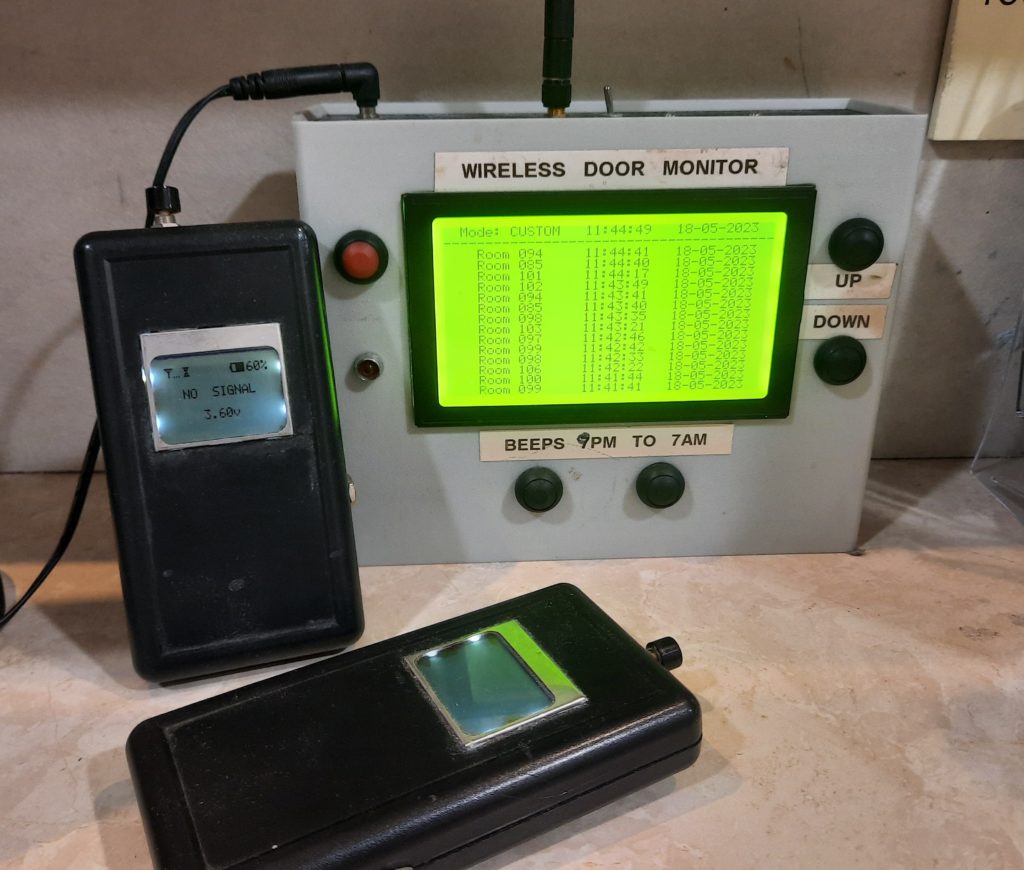
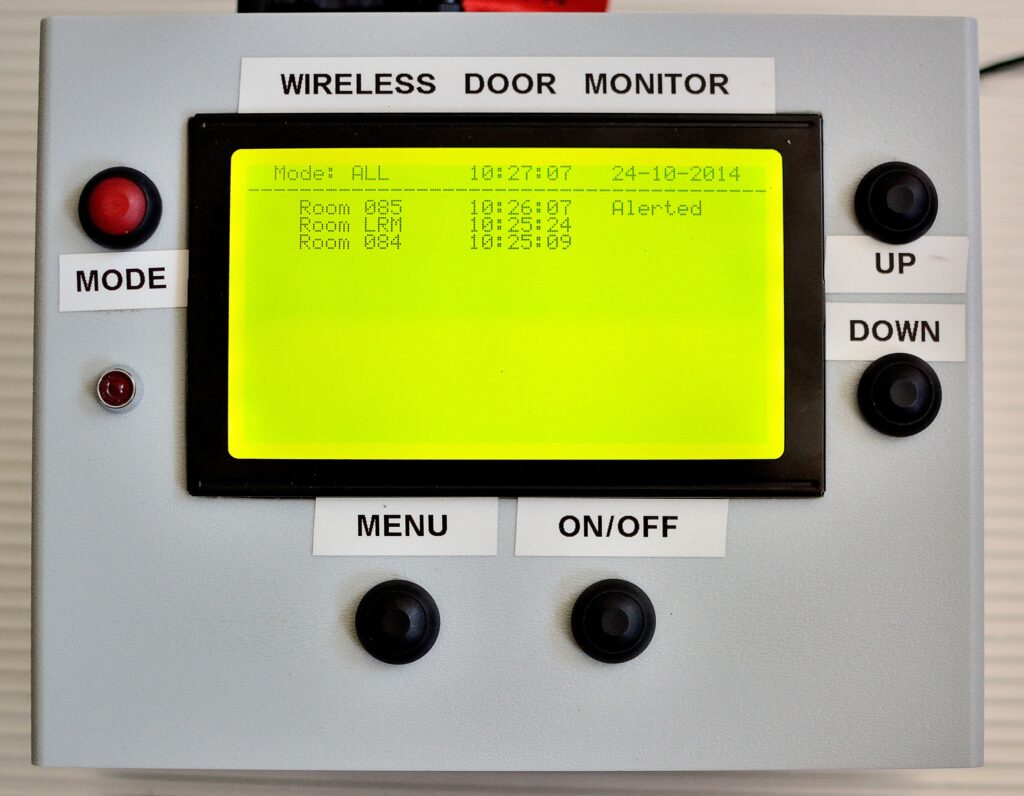
Senior care homes may get a bad rap in popular culture, but they serve a legitimate and important purpose. As people age, their requirements for care can exceed the capability of their families. When that becomes the case, professional care may be prudent. To help those professionals care for residents, Hayden designed this system that can monitor up to 40 doors in a nursing home.
The senior care facility where Hayden works already had a system for monitoring each resident room with a PIR (passive infrared) sensor. But that system was no longer functional and wasn’t serving any purpose. Instead of buying a whole new system, Hayden chose to tap into the existing sensors. To do that, they used five Arduino Mega 2560 boards to create hub units. Those hubs were spread around the building and each one monitors the PIR sensors from a handful of rooms.
Those hub units contain nRF24L01 radio transceiver modules so they can communicate sensor status to a central control unit, powered by an Arduino Mega as well. That control unit features a 240×128 LCD to display the status of each room along with a real-time clock, an SD card module for logging data to CSV, and a piezo buzzer and LED for alerts. But attendants aren’t always near that control unit, so Hayden also built a handful of handheld devices. Those are more rudimentary and only include nRF24L01 modules, small screens, and batteries. Employees can carry those smaller devices with them at all times and they will display any room with activity that triggers the PIR sensor, ensuring that a resident receives immediate attention if they leave their room when they shouldn’t.
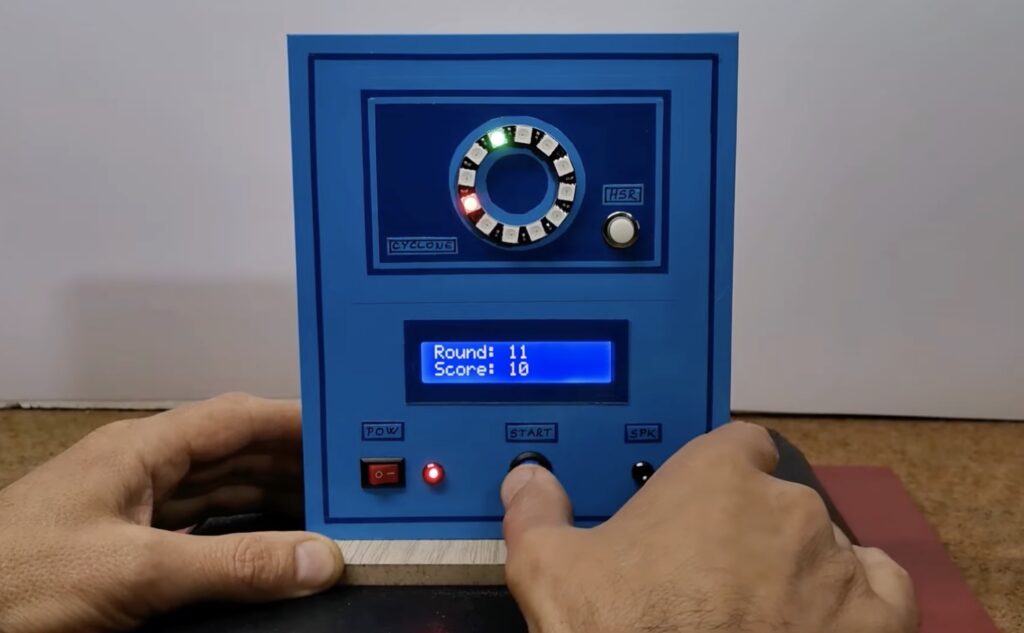
One of the most popular machines in any arcade is the Cyclone game, where a ring of LEDs illuminate in sequence and the player must push a button at the exact moment that a specific LED lights up. Get it just right and you can win a whole pile of tickets to spend in the arcade shop! But the machines in arcades tend to be rigged, with the timing altered slightly to make the game more difficult. This mini Cyclone game saves you a trip to the arcade and doesn’t employ cheats (unless you want it to).
This is the second Cyclone game built by Mirko Pavleski. The first was much larger, with a ring of 60 LEDs. The new version is smaller and simpler. It has a ring of only 12 LEDs. The original increased the speed with each round, but this version sets a random speed (within a predefined range) each time. It tracks the number of rounds completed by a player before they fail and saves that high score in EEPROM storage so it is persistent every time someone turns on the game.
The hardware is affordable and easy to find. It includes an Arduino Nano board, a WS2812B LED ring, a 16×2 character LCD with I2C interface, two buttons, a power switch, and a buzzer. Those components all mount to a basic stand made of PVC board and plywood wrapped in self-adhesive wallpaper. If you’re a fan of Cyclone games, this would make a great weekend project.
Optimizing manufacturing processes is a requirement in any industry today, with electricity consumption in particular representing a major concern due to increased costs and instability. Analyzing energy use has therefore become a widespread need – and one that can also lead to early identification of anomalies and predictive maintenance: two important activities to put in place in order to minimize unexpected downtime and repair costs.
In particular, this approach can be applied to DC motors: used in a wide range of applications, from small household appliances to heavy industrial equipment; these motors are critical components that require regular maintenance to ensure optimal performance and longevity. Unfortunately, traditional maintenance practices based on fixed schedules or reactive repairs can be time-consuming, expensive, and unreliable. This is where energy monitoring-based anomaly detection comes in: it can provide a crucial solution for the early detection of potential issues and malfunctions before they can cause significant damage to the motor.
This more proactive approach to maintenance continuously monitors the energy consumption of the motor and analyzes the data to identify any deviations from normal operating conditions. By tracking energy usage patterns over time, the system can detect early warning signs of potential problems, such as excessive wear and tear, imbalances or misalignments, and alert maintenance personnel to take corrective actions before the issue escalates.
Our solution
This Arduino-powered solution implements an energy monitoring-based anomaly detection system using a current sensor and machine learning models running on edge devices. By capturing the electricity flowing in and out of a machine, it can collect large amounts of data on energy usage patterns over time. This data is then used to train a machine learning model capable of identifying anomalies in energy consumption behaviors and alerting operators to potential issues. The solution offers a cost-effective and scalable method for maintaining equipment health and maximizing energy efficiency, while also reducing downtime and maintenance costs.
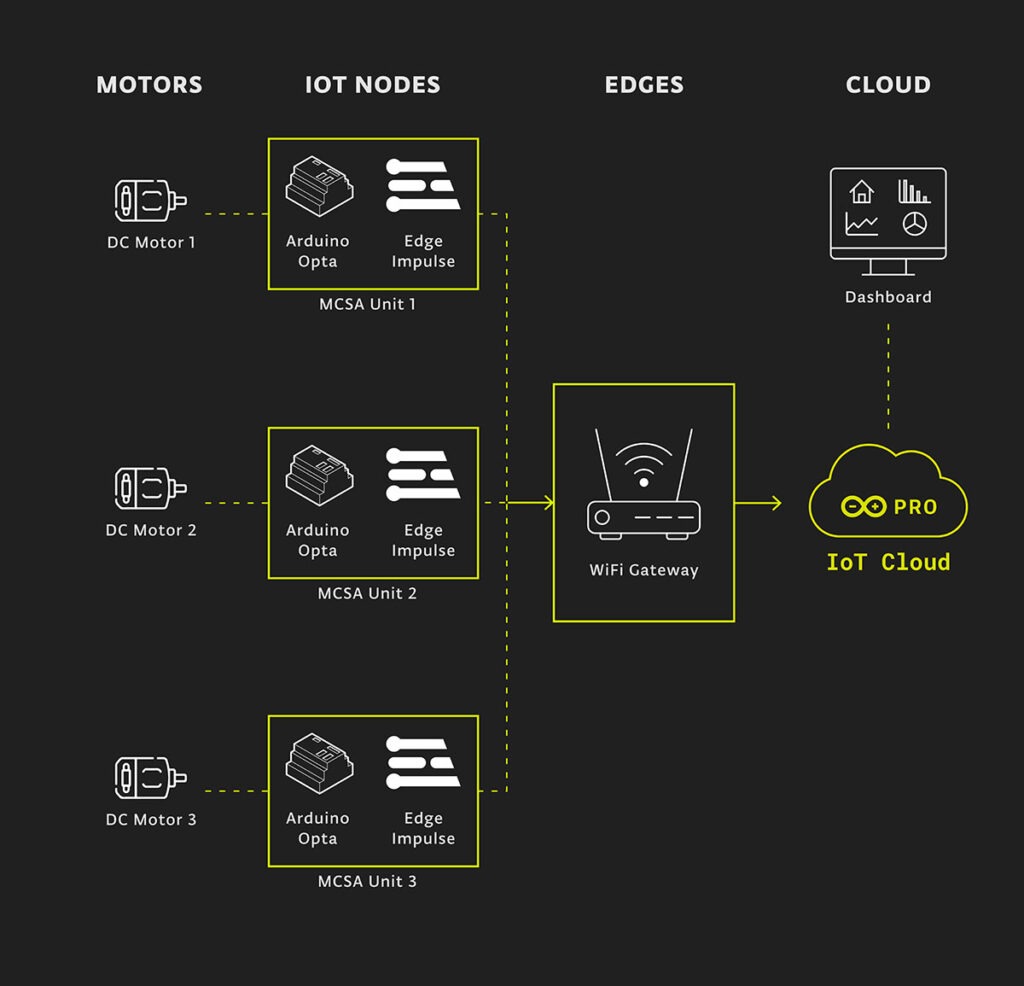
Motor Current Signature Analysis (MCSA)
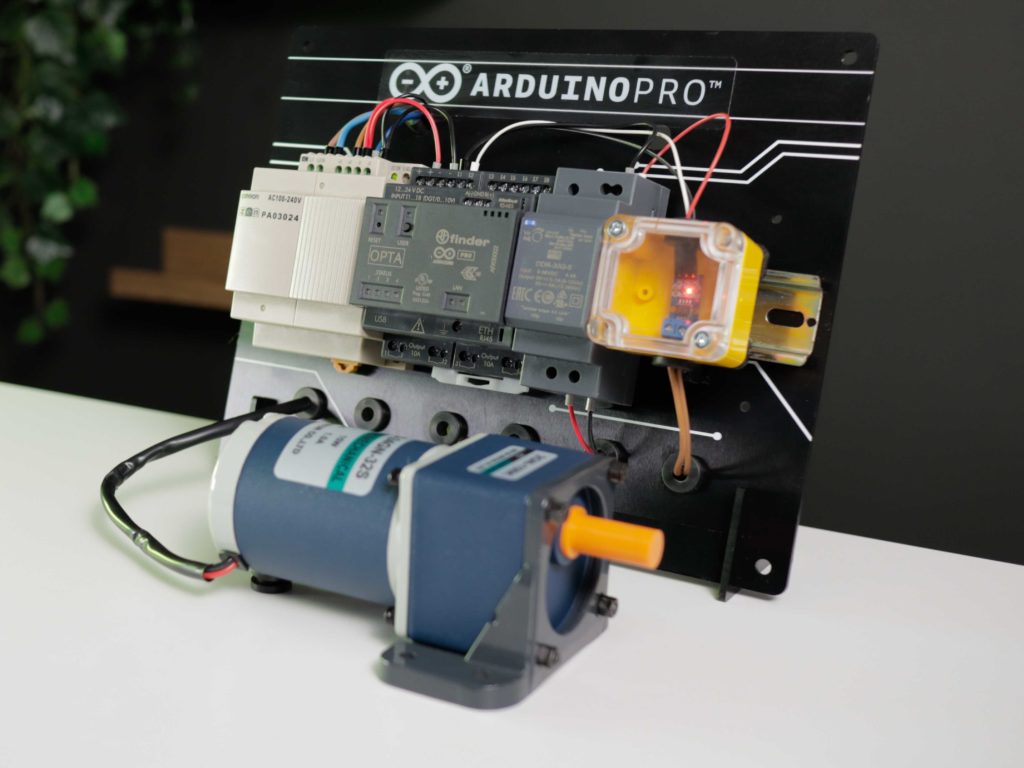
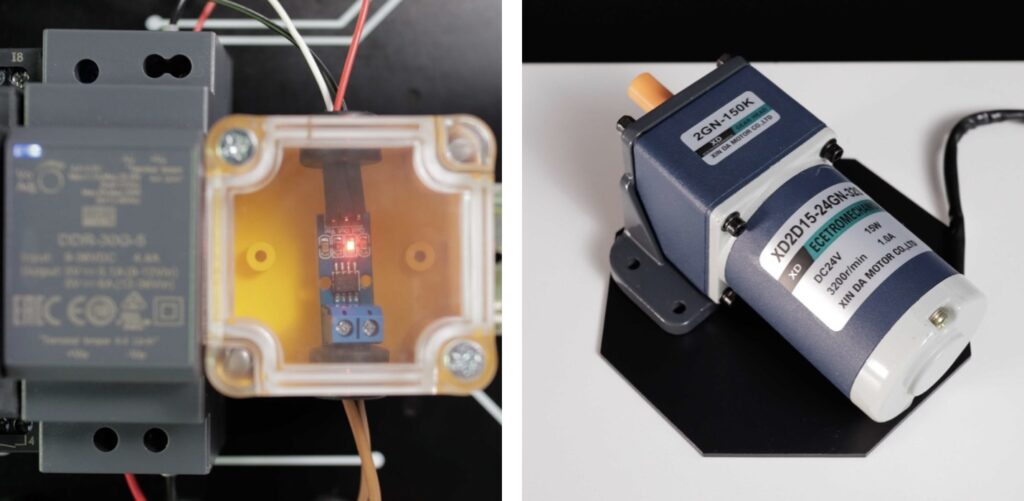
In this application, a technique called Motor Current Signature Analysis is used. MCSA involves monitoring the electrical signature of the motor’s current overtime to detect any anomalies that may indicate potential issues or faults. To acquire real-time data, a Hall effect current sensor is attached in series with the supply line of the DC motor. The data are then analyzed using machine learning algorithms to identify patterns and trends that might indicate a faulty motor operation. MCSA can be used to detect a number of issues like bearings wear, rotor bar bendings or even inter-turn short circuits.
Depending on the dimensions of the motor, using a non-invasive clamp-style current sensor – also known as a Split-Core Current Transformer – is recommended if a larger current draw is expected.
Edge ML
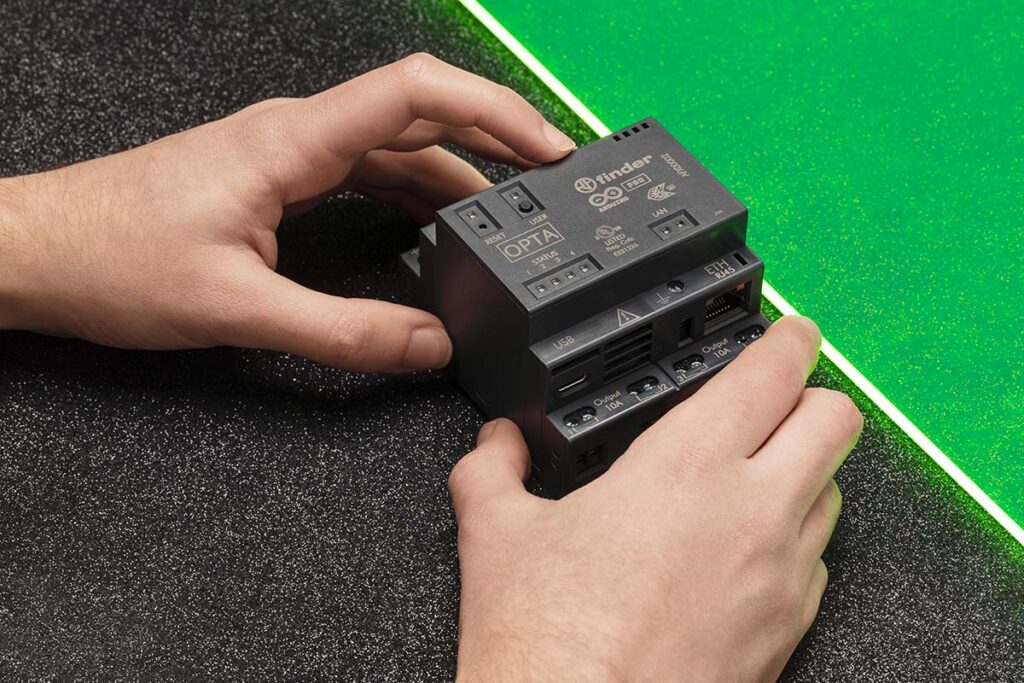
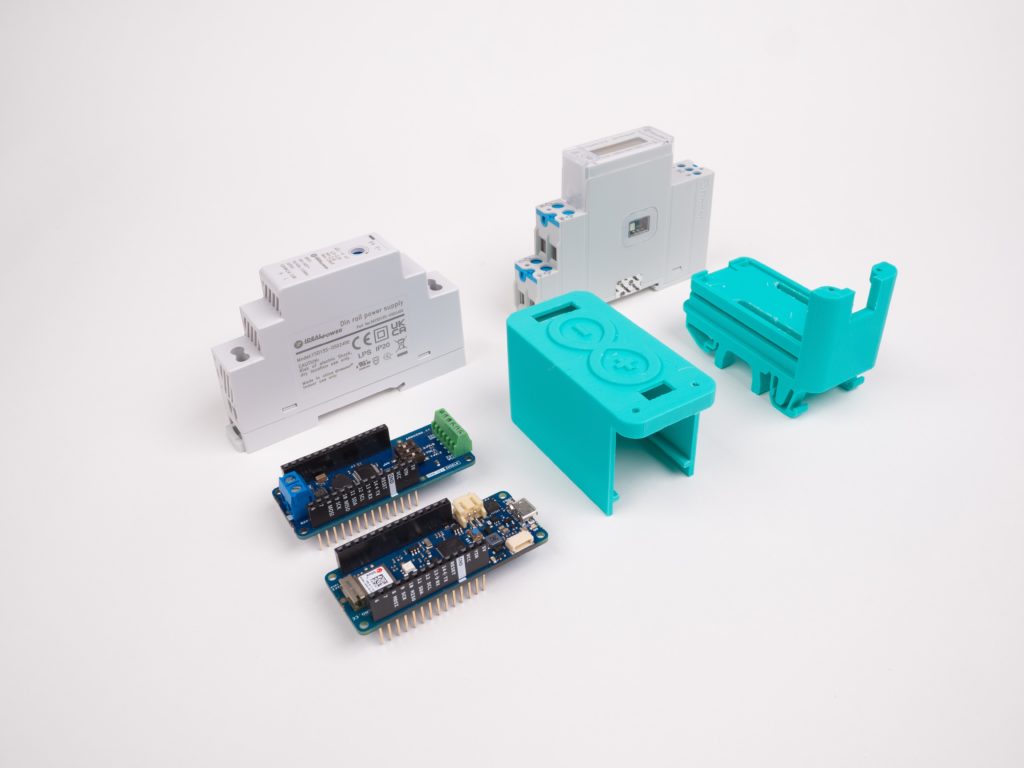
To monitor the current fluctuation and run the anomaly-detecting ML model, the solution uses an Arduino Opta WiFi: a micro PLC suitable for Industrial IoT, which is excellent for this project because of its real-time data classification capabilities, based on a powerful STM32H747XI dual-core Cortex®-M7 +M4 MCU. The Arduino Opta WiFi works with both analog and digital inputs and outputs, allowing it to interact with a multitude of sensors and actuators. The Arduino Opta WiFi also features an Ethernet port, an RS485 half duplex connectivity interface and WiFi/Bluetooth® Low Energy connectivity, which makes it ideal for industrial retrofitting applications. You can find the full datasheet here.
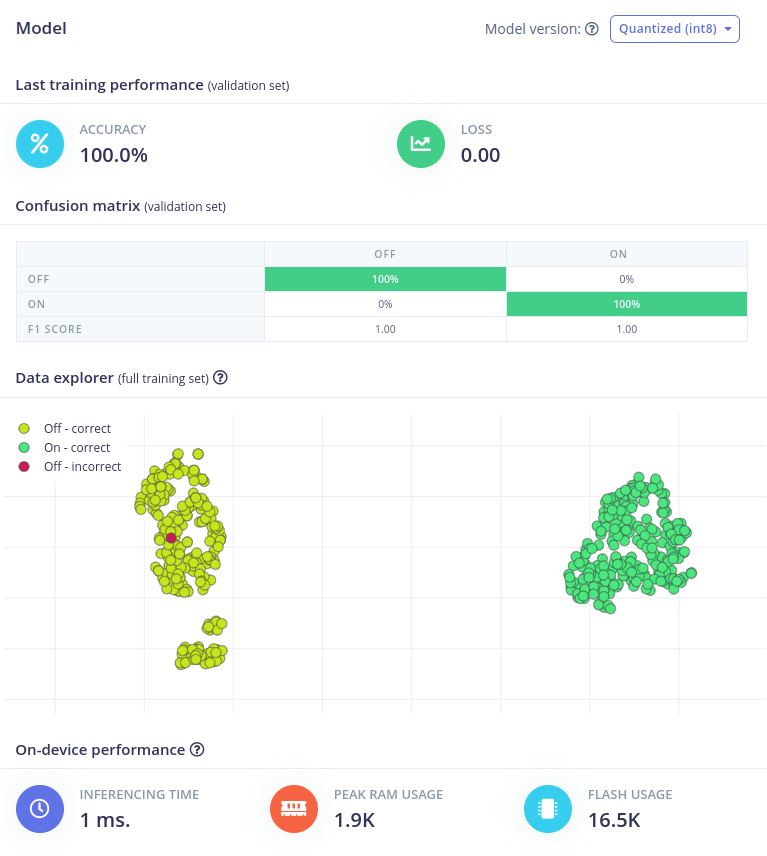
To train the anomaly detection model, the project leverages the Edge Impulse platform: being integrated within the Arduino ecosystem, it makes it easy to develop, train, and deploy machine learning models on Arduino devices.
Connectivity
Once the machine learning model was successfully deployed on the Arduino Opta, the anomaly detection results were forwarded via WiFi to the Arduino IoT Cloud. This enables easy monitoring and analysis of the data from multiple sensor nodes in real time.
Solving it with Arduino Pro
Let’s take a look at how we can put all of this together and what hardware and software solutions we would need for deployment. The Arduino Pro ecosystem is the most recent version of Arduino solutions, offering users the benefits of easy integration along with a range of scalable, secure, and professionally supported services.
The Arduino IDE 2.0 was used to program the Arduino Opta WiFi using C/C++. To train the Edge Impulse model, data was gathered from the current sensor for two classes: Normal Operation and Machine Off. The Motor Current Signature Analysis (MCSA) technique was implemented by extracting the frequency and power characteristics of the signal through a Spectral Analysis block. Additionally, an anomaly detection block was incorporated to identify any abnormal patterns in the data.
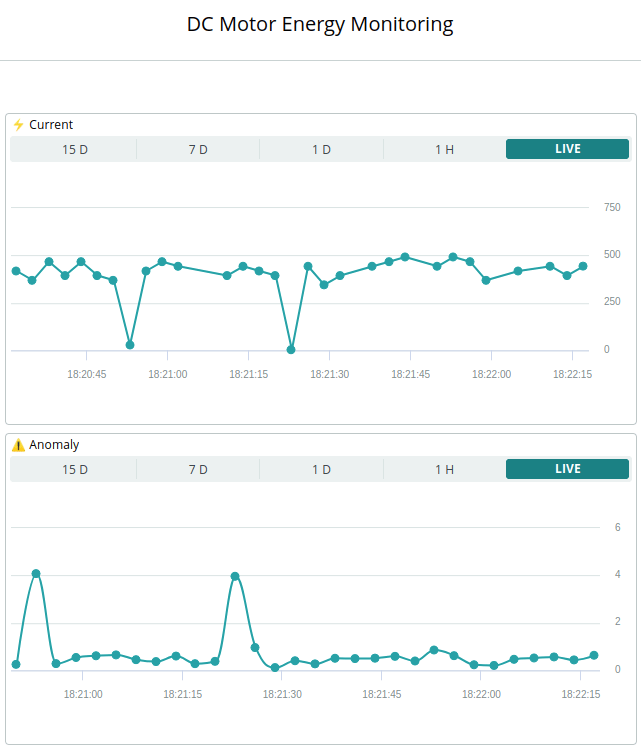
Here is a screenshot from a dashboard created directly in the Arduino Cloud, showcasing data received from the sensor nodes:
Here is an overview of the software stack and how a minimum deployment with one of each hardware module communicates to fulfil the proposed solution:
Conclusion
Through the implementation of a predictive maintenance system on an Arduino Opta WiFi PLC, using Edge Impulse ML models and the Arduino Cloud, this solution demonstrates the powerful potential of IoT technologies in industrial applications. With the use of current sensors and AI-driven anomaly detection models, the system enables real-time monitoring and fault detection of DC motors, providing valuable insights for predictive maintenance. The flexibility and scalability of the Arduino Opta WiFi platform make it a robust and cost-effective solution for implementing predictive maintenance systems in various industrial processes. Overall, the project highlights the significant advantages that MCSA and machine learning can offer in promoting efficiency, productivity, and cost savings for industrial processes.
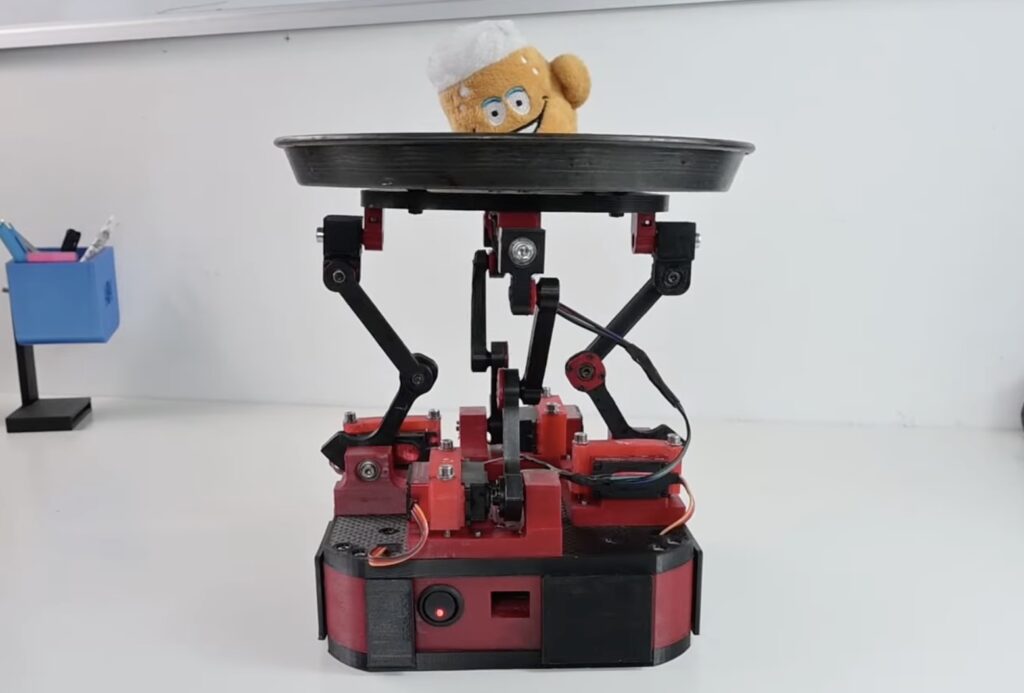
Experienced servers are masters of balance and coordination, being able to carry several full glasses on a tray without spilling a drop. But many of us lack that skill and can’t carry even a single glass across a room without splashing half of it on our feet. To help the clumsy among us, YouTuber The Fedmog Challenge created this robotic beer tray that automatically balances glasses to avoid spills.
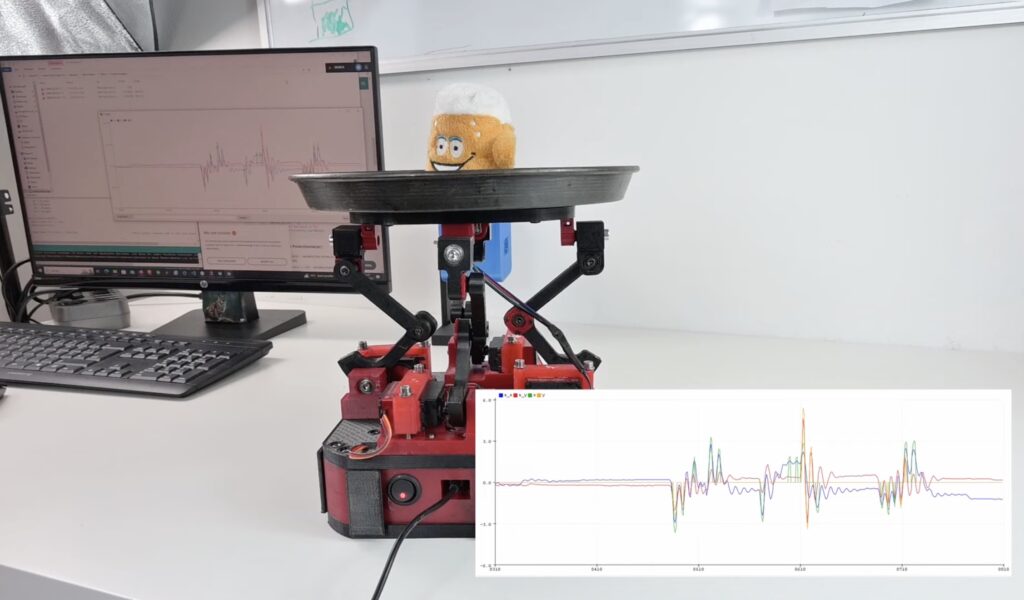
This robotic beer tray relies on the same kind of control algorithm used by self-balancing robots and drones: PID (proportional-integral-derivative). That acronym isn’t very informative unless you were a math major, but it means that the robot uses fancy calculations to compensate for movement in real time through a closed-feedback loop. In this case, the beer tray is constantly checking to see if it is level. If it isn’t, then it uses motors to bring itself back to level as fast as it can without overcompensating.
The Fedmog Challenge made this machine using 3D-printed parts. The user holds the base and that connects to the tray on top via four servo-actuated linkages. An MPU6050 gyro/accelerometer module mounts to the tray and to detect its position. An Arduino Nano board monitors the MPU6050 and adjusts the servo motor angles as necessary to keep the tray level.
There are a couple of problems with this design that keep it from being practical, though. First, the servos aren’t strong enough to handle much weight. Second, keeping the tray level isn’t enough to avoid spills. To do that, it would need to tilt to compensate for horizontal inertia. But we still like the idea and the build is fun to watch.
Almost all haptic feedback today comes in the form of vibration. But vibratory haptic feedback is clearly lacking, as it cannot convey information with any kind of precision or granularity. The user notices the vibration and very course patterns may be recognizable, but that is a rudimentary approach that requires a lot of user focus. To help people navigate as they walk through cities, a team from the Max Planck Institute for Intelligent Systems developed a shape-changing interface called S-BAN.
The researchers designed S-BAN (Shape-Based Assistance for Navigation) to work with existing GPS navigation systems, such as Google Maps on smartphones, but to provide a better user experience. The S-BAN device looks like a small remote and the fore end actuates in two dimensions. It can move forward and backward, and pivot left and right to guide the user. If, for instance, the user needs to make an immediate left turn, it will pivot left. This lets people with visual impairments navigate through touch and helps everyone else walk with their eyes up instead of focused on their phones.
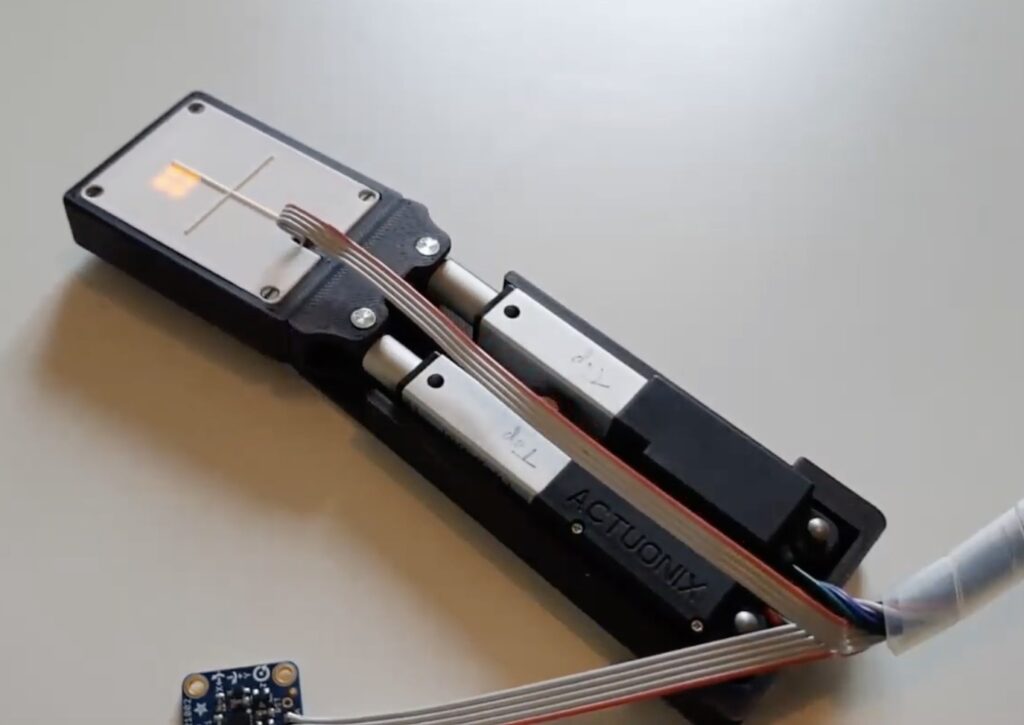
The prototype S-BAN unit contains an Arduino Nano board, a Bluetooth module for communication with the user’s smartphone, an IMU to monitor the current orientation of the device, a LiPo battery, and two miniature linear actuators. The complete package, in a 3D-printed enclosure, is very compact and could even double as a smartphone case to make its use more convenient.
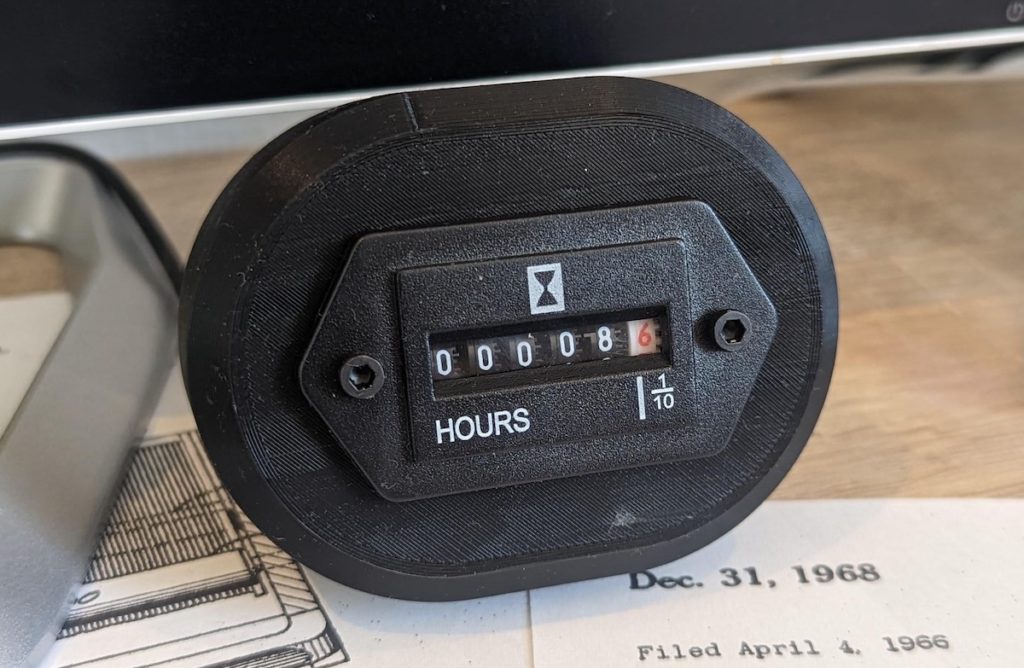
Hour meters are common for many types of machinery, because they serve a similar to purpose as your car’s odometer. When time running is a more important metric than distance, an hour meter is a good choice. And because they’re common, it is easy to find hour meters in any style you can imagine — both vintage and new. This Instructables tutorial from Gautchh will show you how to convert an hour meter into a time tracker for your work or leisure activities.
You could, of course, just use an app or a stopwatch to track your time, but this is much more appealing. The idea is simple: a specific action on your computer triggers the device and it will continue ticking up until another action triggers it to stop. Gautchh provides a Python script that triggers the meter when a specific process runs or stops. The user can choose the process, which should correspond to whatever software they want to track. For it to work properly, however, that process can’t run in the background when the user isn’t actively using the software.
On the hardware side, an Arduino Nano board will accept commands from the connected PC via the Serial connection and will control the hour meter. If you buy the same hour meter as Gautchh, you can follow their instructions and use their code. If you buy another model, you may need to perform some reverse-engineering to figure out the control signals and tweak the code. A simple 3D-printed enclosure houses the meter and the Arduino, putting them in a compact package that can sit unobtrusively on a desk.
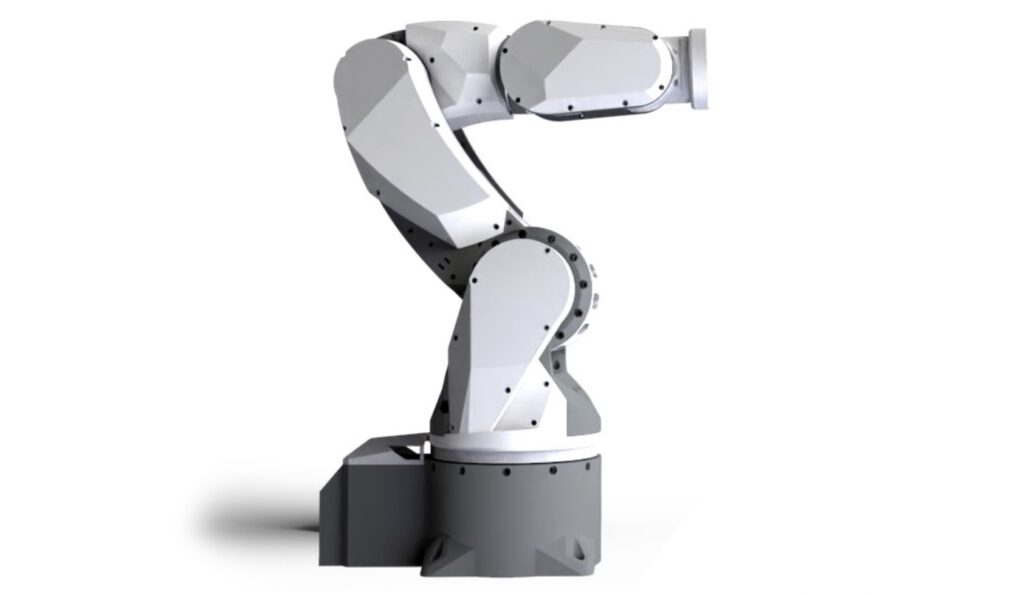
If you want a robot arm, either for some practical job or just fun, you have a lot of options. There are many consumer and industrial robot arms on the market, but the models that aren’t glorified toys tend to be pricey. You can also build your own. If you go that route, you’ll want a design that is well-engineered and well-documented. It isn’t free, but the ARCTOS robot arm is a high-quality option that meets both of those criteria.
Based on aesthetics alone, the ARCTOS robot arm looks fantastic. It resembles something you’d see in a lab in a sci-fi movie. But it also offers more than a pretty package. It has six degrees of freedom and a payload of 500 grams, making it suitable for tasks ranging from pick-and-place to packing boxes. Best of all, you can assemble it using easily sourced hardware and 3D-printed parts. Those parts are PLA and just about any modern 3D printer can handle the fabrication.
The ARCTOS design files will set you back €39.95 (about $44) and sourcing all of the parts for the build will cost around $400. Stepper motors actuate the joints, through simple belt drives and cycloidal gear boxes. An Arduino Mega 2560 controls those through a standard CNC shield. It runs open source firmware based on GRBL that will work with a variety of control software options to suit different tasks.
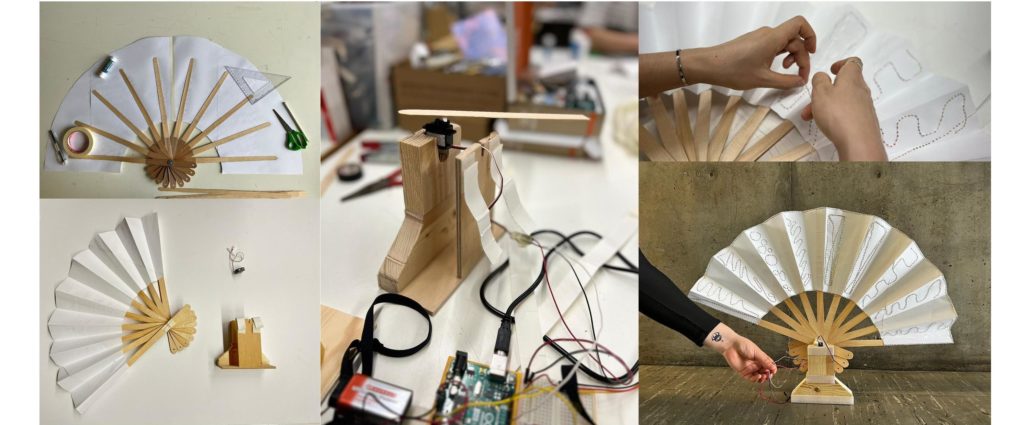
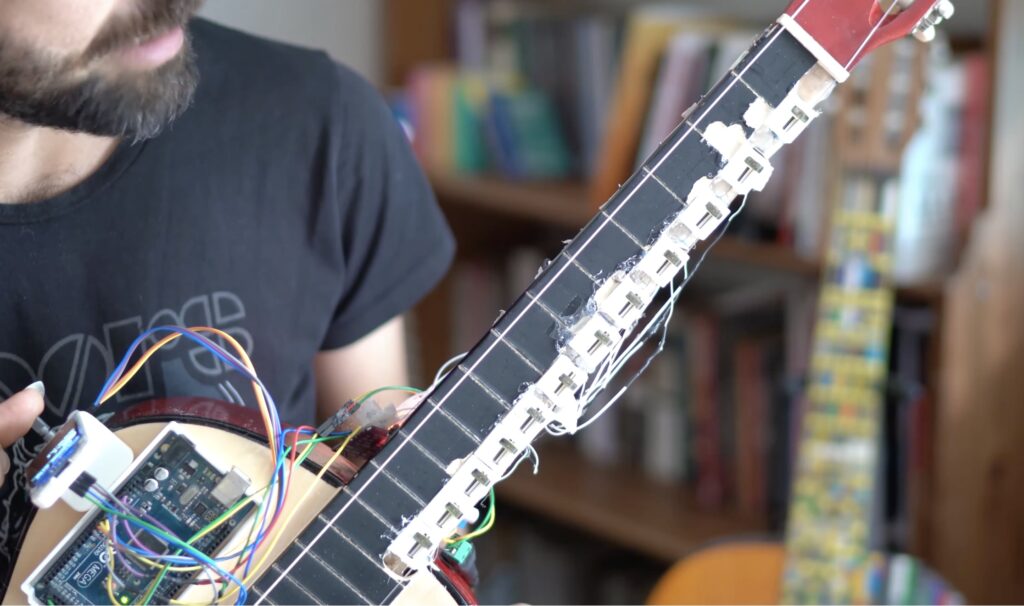
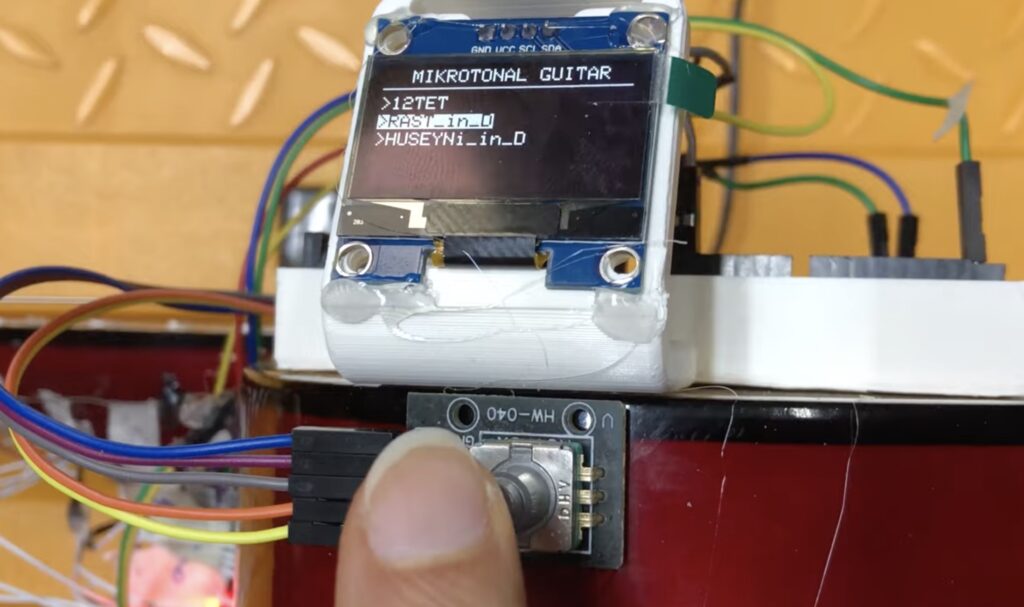
Playing the guitar is a great way to impress people at beach parties, but learning to play the guitar isn’t easy. Even grasping the basic theory is a big task and that’s before you even start to practice finger positioning and movement. That’s why Tolgahan Çogulu and Selçuk Keser built this automatic microtonal guitar to make things a little easier.
This guitar isn’t fully automatic in the way the same way as a player piano. At this time, the prototype only has a single automatic string (the high E) and so it is very limited in range. And the guitarist still has to do a lot of the work. They have to pluck the string and push buttons in the correct sequence as they do. But the guitar is able to adjust the exact point that those buttons push the string down onto the fret board. Because that point alters the length of the string, the guitar can alter the note for each button the guitarist presses as they play.
The prototype works by using an Arduino Mega 2560 board to control a series of tiny servo motors attached to the guitar’s fret board with 3D-printed mounts. The servos move small sliders back and forth along the string to change the pitch. The guitarist pushes down on the sliders like buttons, forcing them to push the string against the fret board at the set point. It is useful mostly for adjusting the tuning prior to the start of a song, but future iterations may be able to alter the tuning during a song.
We’re excited to announce the release of two new widgets to the Arduino IoT Cloud: the Value Selector and Value Dropdown Widgets.
In this blog post, we’ll be exploring the benefits of the new widgets, how to use them, and how you can take advantage of this latest feature.
The Arduino IoT Cloud dashboards
The Arduino Cloud is an all-in-one platform that streamlines the development, deployment, and management of IoT devices. The platform supports various hardware, such as Arduino boards, ESP32, and ESP8266-based boards, which makes it easy for makers, IoT enthusiasts, and professionals to build connected projects without much hassle.
What makes Arduino Cloud stand out is its user-friendly and intuitive interface. This simplifies complex tasks and ensures that even those with little coding experience can use the platform. Moreover, the platform offers a low-code approach and a comprehensive catalogue of templates and examples that enable users to get started quickly.
The IoT Cloud application of the Arduino Cloud platform allows easy management and monitoring of connected devices via customizable dashboards. This feature provides real-time data visualizations of the device’s data, making it easy for users to monitor and keep track of their devices. Plus, with the mobile app Arduino IoT Cloud Remote — available for Android and iOS — users can manage their devices remotely from anywhere.
The Arduino Cloud platform also offers a range of widgets, including switches, buttons, color selectors, status, gauges, maps, and a chart widget that allows users to plot the temporal evolution of one variable of one device. This rich palette of widgets makes it easy for users to build dashboards that suit their needs.
The new widgets
The new Value Selector and Value Dropdown Widgets simplify the task of creating a map between variable values and their real-world representations, providing users with greater flexibility and ease of use. With them, you can decouple the internal values of the variables in the sketch from the representation on the dashboard. This simplifies the code and prevents developers from updating the code if a change on the visible value is needed.
The Value Selector Widget offers a more visual way of representing values and choices, making it easier for users to understand and work with their data. This feature simplifies the code and allows for greater flexibility in representing data.
The Value Dropdown Widget is a compact and organized way of presenting a list of options to users. This feature is particularly useful when designing for smaller screens or when there are many options to choose from. Dropdown menus allow for clear categorization and organization of options, making it easier for users to find what they are looking for.
Both of these new features are incredibly convenient for predefining a list of values that the user can choose from. The meaningful names and values assigned to each option simplify the process of selecting data, making it more intuitive and accessible to users.
In summary, the Value Selector and Dropdown Widgets are powerful new features that provide users with greater flexibility, ease of use, and clarity when working with their data. We are excited to see how these new tools will enhance the user experience and improve the way users work with their data. These new widgets add up to the recently announced improvement of the percentage widget and the new advance chart widget. You can read the full story in the blog post.
Try the now widgets today
Ready to take your IoT projects to the next level? Check out the official Arduino Cloud website for more information on the Arduino IoT Cloud and all the resources available to you. You can also explore the documentation to learn more about the exciting new widgets that are available.Dive in and try out the new Arduino IoT Cloud widgets for yourself! We’d love to hear your feedback, so don’t forget to share your thoughts and experiences with us on the forum.
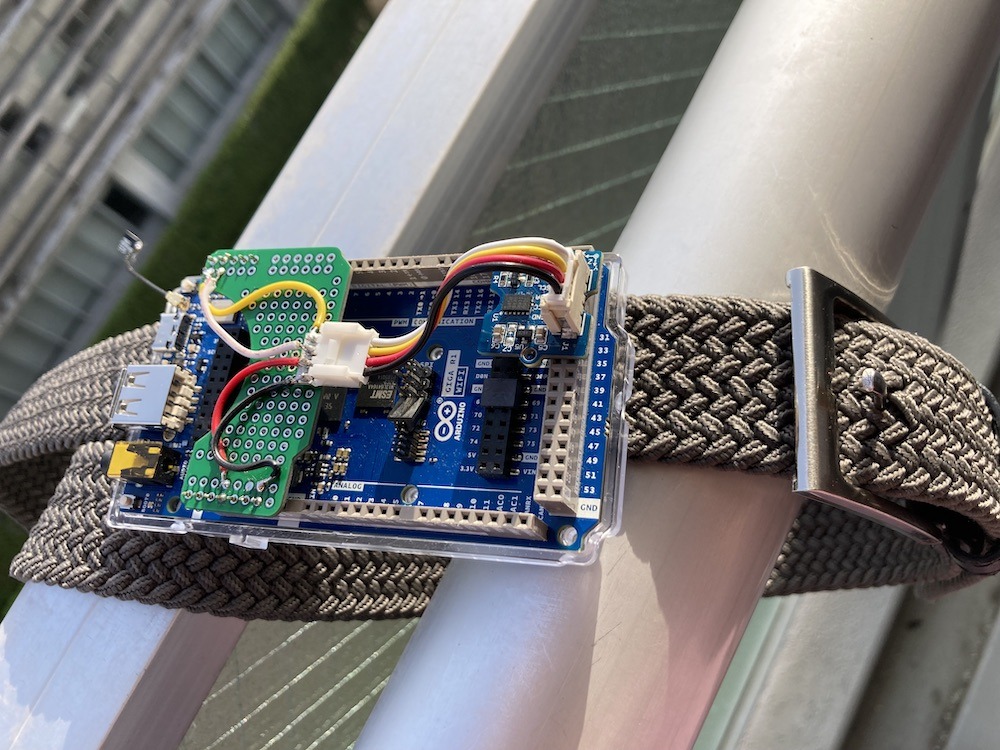
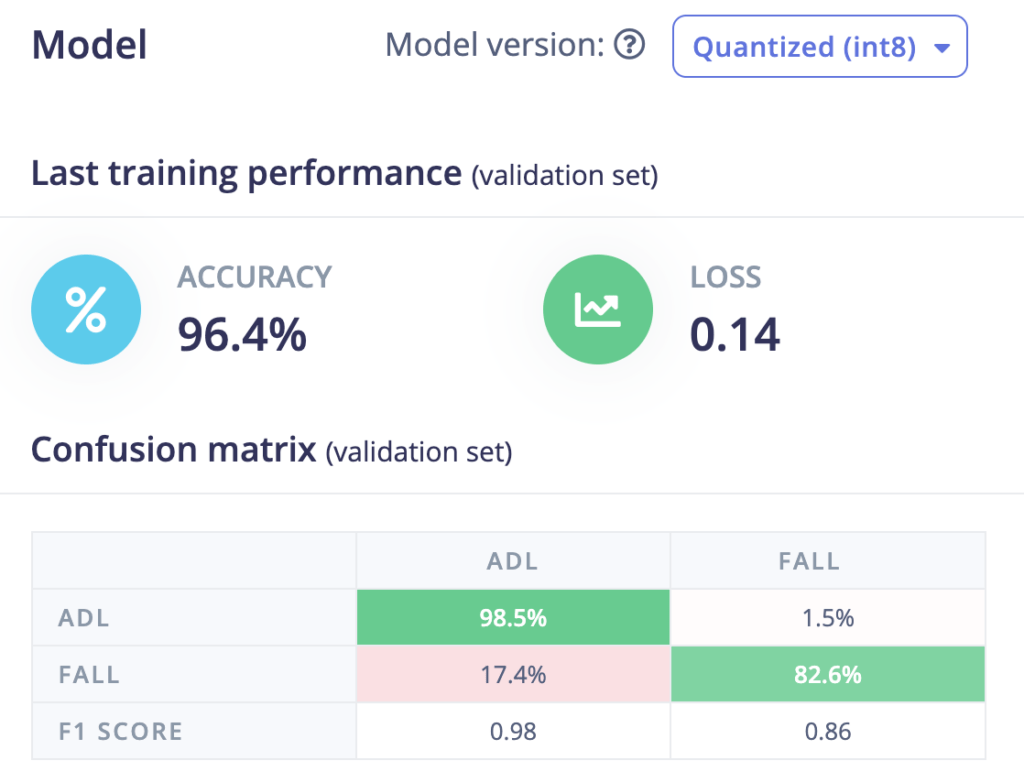
For those aged 65 and over, falls can be one of the most serious health concerns they face either due to lower mobility or decreasing overall coordination. Recognizing this issue, Naveen Kumar set out to produce a wearable fall-detecting device that aims to increase the speed at which this occurs by utilizing a Transformer-based model rather than a more traditional recurrent neural network (RNN) model.
Because this project needed to be both fast and consume only small amounts of current, Kumar went with the new Arduino GIGA R1 WiFi due to its STM32H74XI dual-core Arm CPU, onboard WiFi/Bluetooth®, and ability to interface with a wide variety of sensors. After connecting an ADXL345 three-axis accelerometer, he realized that collecting many hours of samples by hand would be far too time consuming, so instead, he downloaded the SisFall dataset, ran a Python script to parse the sample data into an Edge Impulse-compatible format, and then uploaded the resulting JSON files into a new project. Once completed, he used the API to split each sample into four-second segments and then used the Keras block edit feature to build a reduced-sized Transformer model.
The result after training was a 202KB large model that could accurately determine if a fall occurred 96% of the time. Deployment was then as simple as using the Arduino library feature within a sketch to run an inference and display the result via an LED, though future iterations could leverage the GIGA R1 WiFi’s connectivity to send out alert notifications if an accident is detected. More information can be found here in Kumar’s write-up.
Energy crises are nothing new, but they’re always painful. Right now, the world is dealing with a serious energy crisis that has led to skyrocketing utility bills, economic uncertainty, and widespread questions about how we supply our homes with power.
One of the biggest questions being asked right now is, “how do we avoid this kind of energy crisis in the future?” What steps can we take — as individuals and societies — to mitigate energy crises and deal with them more effectively when they do come around?
Automation is one powerful tool at our disposal here. It can be used not just by governments and energy companies, but also by individual households. The good news is that tools like Arduino and the Arduino Cloud can help you build automated devices to better manage your energy usage and save money in times of crisis.
In this article, we’ll take a look at how automation can help us use our energy more efficiently, avoid major crises, and pave the way to a more sustainable and reliable energy future.
What’s going on with the current energy crisis?
The energy crisis of 2022 is the culmination of several unfortunate recent trends. As demand for energy bounced back hard after the pandemic, the world simultaneously saw a reduction in natural gas supply — largely related to the Russia-Ukraine conflict and associated disruptions. As a result, gas prices have increased significantly, and the prices of other fossil fuels like coal and oil have followed suit. This has left millions of families around the globe facing an uncertain winter and some pretty tough financial conditions.
How automation can help with an energy crisis
Smart grids
Energy grids are the source of power for most of our homes. When you switch on the lights, turn on the heat, and take a hot shower — the energy for all these tasks is drawn from the grid of power that services your region.
If we can find ways to run energy grids more efficiently and reliably, we can do more with less energy, leading to lower costs and minimal disruption even during periods of energy uncertainty.
One way to do this is through smart grids. This is when ordinary energy grids are enhanced with technology like sensors that continuously monitor performance, collecting huge amounts of data on things like energy usage and wastage while predicting issues before they even arise.
By feeding this data back to control centers, smart grids allow energy providers to run their grids much more effectively. They can anticipate and fix issues before they become serious problems, identify areas where energy is being wasted, and make plans based on concrete data.
Digitize the oil and gas industry
The oil and gas industry is enormous and like most large, established industries it can be slow to adapt and modernize in many ways.
While more agile companies have been quick to embrace digital transformation and all the advantages it brings, giant energy companies are much more slow-moving and rely on often outdated processes and technology. This results in inefficiencies, higher costs, and increased environmental damage.
But what if the oil and gas sector can harness digital tools to run more effectively? A more well-oiled fossil fuel industry could be a major factor in mitigating energy crises and moving towards a cleaner and more sustainable energy future. Here are some ways digital transformation could benefit oil and gas:
Maintain equipment and monitor conditions. With technologies like the Internet of Things, it’s possible for oil and gas companies to monitor their processes more closely in real-time. This enables them to predict issues and make repairs before any problems arise, tweak processes to optimize performance, avoid downtime and delays, and save money.
Be more sustainable and environmentally conscious. Technology can help oil and gas companies become more sustainable in many ways — from tracking waste and monitoring energy use to removing harmful compounds from their processes and even combining fossil fuels with cleaner energy sources.
Improve access to energy reserves. Digital transformation gives energy companies the tools to tap into more energy reserves than before, helping tackle shortages and supply issues around the world.
Artificial intelligence
AI has the potential to improve our lives and societies in all kinds of ways, and the way we use energy and avert future crises is just one example.
Here are just a few of the ways AI can be used to mitigate, manage, and even avert energy crises:
By monitoring energy usage, AI tools can radically reduce energy wastage. For example, by automatically reducing energy usage during non-peak hours, we can save a great deal of energy — a valuable ability when supply is tight.
Make renewable energy sources like wind power more reliable and productive by predicting failures and making data-based decisions via AI models. This will allow us to pivot away from fossil fuels and the energy crises that stem from our overreliance on this type of power.
Optimize energy usage in data centers — something which accounts for around 1% of electricity demand worldwide — enabling us to save significant amounts of power during times of crisis.
It’s not all about energy. Water supply is also a major challenge in many parts of the world, and in the future, we’re likely to face many more water crises.
AI can help here, too. Water wastage is an enormous issue around the world, especially in regions where access to clean water is already limited. AI can help tackle this by closely monitoring and analyzing water supplies and systems, quickly identifying things like leaks, blockages, and other problems that can interrupt supply and lead to wasted water.
By managing water supplies in as effective and data-driven a way as possible, and taking appropriate action in real-time to deal with issues, AI systems can preserve much more water than we currently do, helping every liter stretch further. This can help reduce the risk and severity of water crises and also help us mitigate them when they do inevitably occur.
Take control of your energy
There are many tools available to us when it comes to dealing with energy crises, and they’re not confined to governments and corporations. There’s a lot you can do with automation and technology to manage your own energy usage better — from sensors that track consumption and adjust energy expenditure in your home to more efficient appliances.
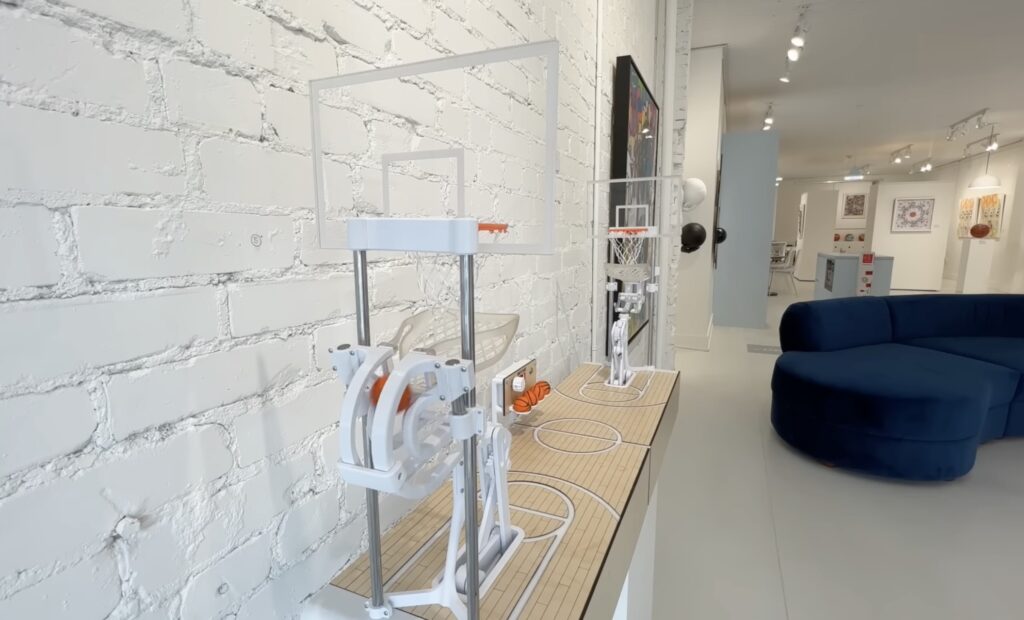
If you aren’t part of that world, you may be making the mistake of thinking that art galleries are full of boring paintings for stuffy socialites. In reality, there are all kinds of different art galleries and some of them have some pretty interesting pieces. Kinetic art is always the most exciting, as demonstrated by JBV Creative’s “Super Splash Bros” basketball sculpture built for display in a local gallery.
There weren’t any rigid constraints for this project, which let JBV Creative express his individuality. He experimented with a few different concepts and had some fun along the way, but ultimately settled on a miniature full court with two robots that throw tiny basketballs back and forth. One robot will throw the ball and sink a basket. The ball then rolls down a chute to land in the “hand” of the second robot, which proceeds to throw the ball back to the first robot’s side. That repeats endlessly, while a counter ticks up the number of sunk free-throws.
Most of this project was an exercise in mechanical design, with all of the parts either being 3D-printed or laser-cut. Beefy stepper motors actuate the robot arms and an Arduino Nano board controls those. The Arduino just needs to know when to do that, which is why each chute has a switch mounted below to detect the presence of a ball. Then it throws the ball and increases the count shown on a four-digit, seven-segment display.
We’re happy to share that version 2.1 of the Arduino IDE is out! Among the many updates and fixes, this latest release includes two main highlights:
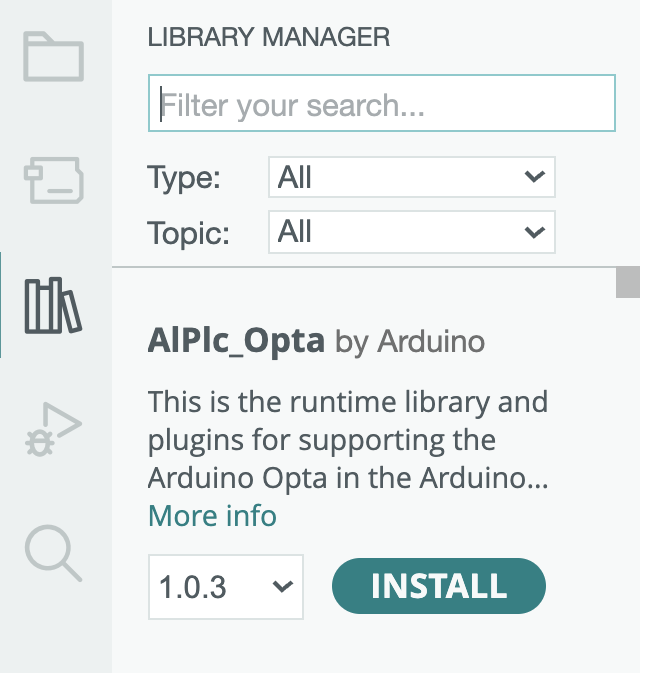
A full redesign of the Library Manager panel, which is now more usable and clear, along with an improved search engine.
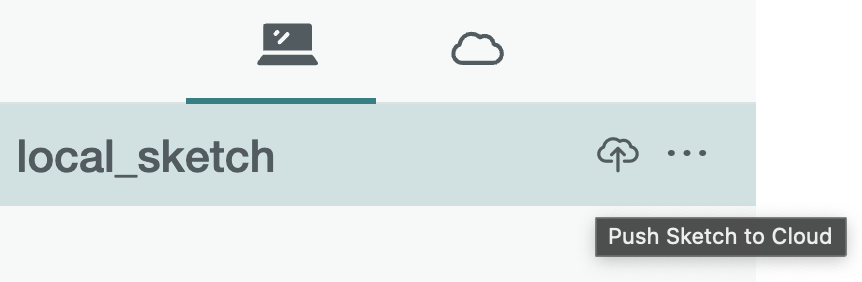
A full redesign of the integration with Arduino Cloud that lets you backup your sketches via a single click and access them on multiple computers (as well as the browser).
The development of the Arduino IDE is made possible thanks to a passionate open source community, and to everyone supporting us with donations, purchases of original Arduino hardware, or Arduino Cloud subscriptions.
As a part of his new raised garden bed project, Shawn Murphy was looking for ways to improve his backyard even further with intelligent IoT systems. Apart from the existing 1800W solar panel array, he also wanted a device that could report current weather and soil conditions in real-time and even perform some watering tasks without the need for human intervention.
Initially, Murphy had researched constructing a pump that could take water from a pair of rain storing barrels and deliver it to the garden bed. However, this would have been costly to build and maintain, so he instead went with a gravity-fed setup. In this configuration, gravity would move water down-slope to a solenoid valve attached to the Arduino IoT Explorer Kit’s 24V relay pin. Once wired together, he added a soil moisture sensor for measuring the water content of the soil, along with a 12V battery pack and solar charge controller for off-grid power.
The resulting hardware was then loaded with a sketch that would continually read the moisture content of the soil, activate the solenoid valve if necessary, and even turn on a small fan if the enclosure were to get too hot. Best of all, the WiFi connectivity of the IoT Explorer Kit allowed Murphy to send the values remotely to an Arduino Cloud dashboard, complete with toggle switches for manually overriding the solenoid valve if necessary.
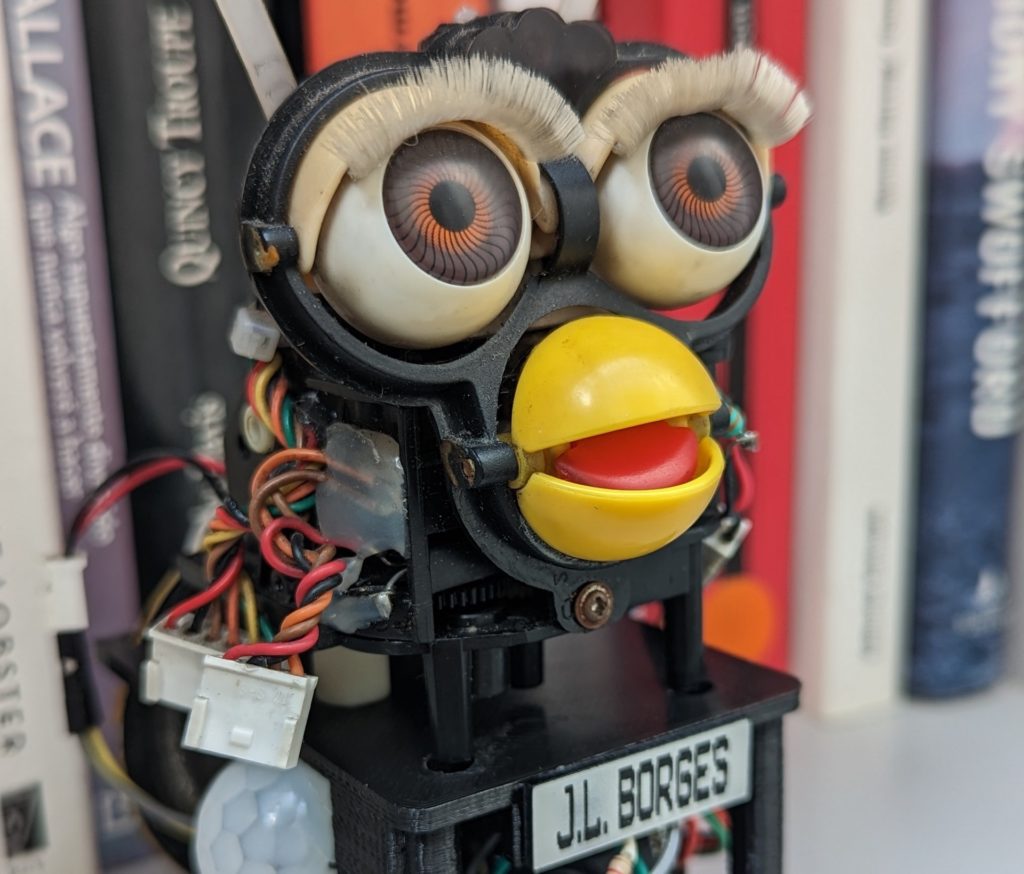
For our younger readers: the Furby is a toy released in 1998 by Tiger Electronics and that saw tremendous success in the following years. Each Furby is a little animatronic creature that resembles the Mogwai from the Gremlins films, but more colorful. When first unboxed, they speak “Furbish,” but then transition to English. While they speak, they move their ears, eyelids, and mouths. The toy has long since lost its popularity, but that didn’t stop Roni Bandini from modifying one to recite Jorge Luis Borges quotes.
While Furby toys are often described as robots, that term would be a stretch. A standard Furby only has a single DC motor to actuate all of the animatronic movement. But a clever gear mechanism controls what moves. If the motor only turns a little bit, it will just move the mouth. It can then turn further to move the ears or eyelids. Bandini discarded the original control board entirely and replaced it with his own to produce sounds, so he just needed to gain control over the DC motor.
Bandini chose to use an Arduino Nano board with an H-bridge for that job. A limit switch tells the Arduino when the motor is in the home position. Then it can rotate the motor the appropriate amount for the desired animatronic movement. Mouth movement syncs with the audio, which comes from a DFRobot DFPlayer Mini MP3 player board. Any time an audio clip is playing, the Arduino will move the Furby’s mouth. To keep it from jabbering on all the time, Bandini added a PIR (passive infrared) sensor. That tells the Arduino when someone moves nearby so it can activate a quote.
The quotes come from Jorge Luis Borges, who was an Argentinian writer of great renown. Bandini kept the Furby in its skinless state, which is a little disturbing. But at least it has deep and philosophical things to say.
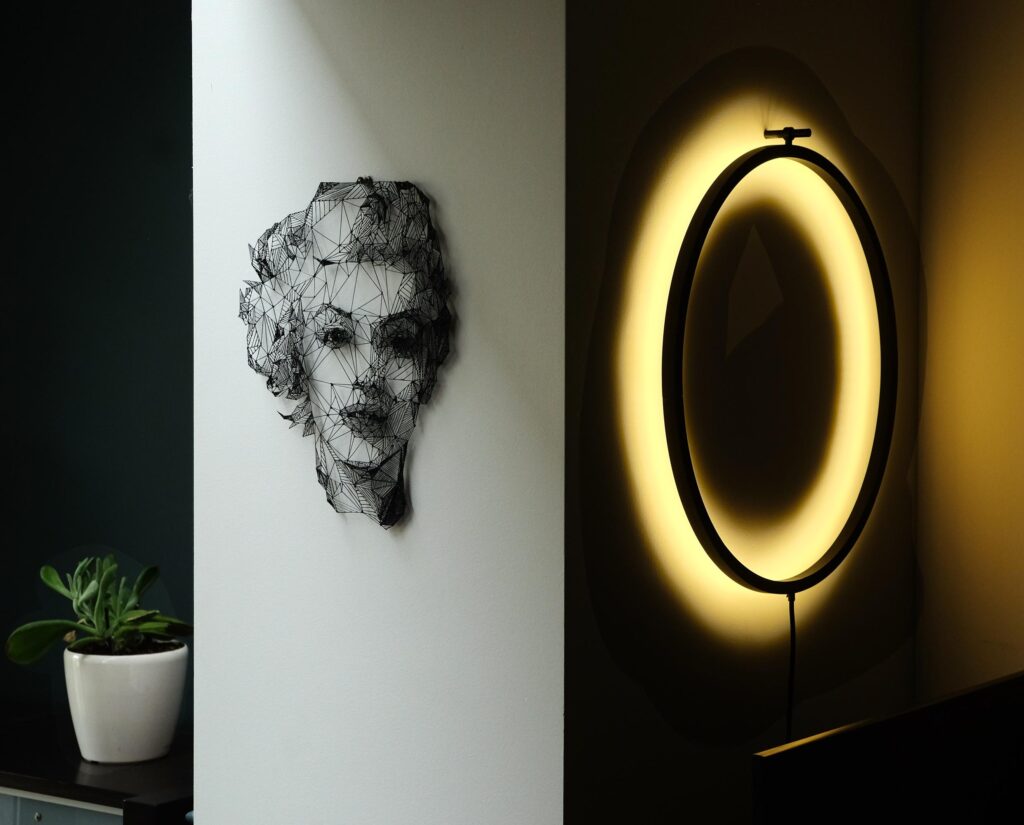
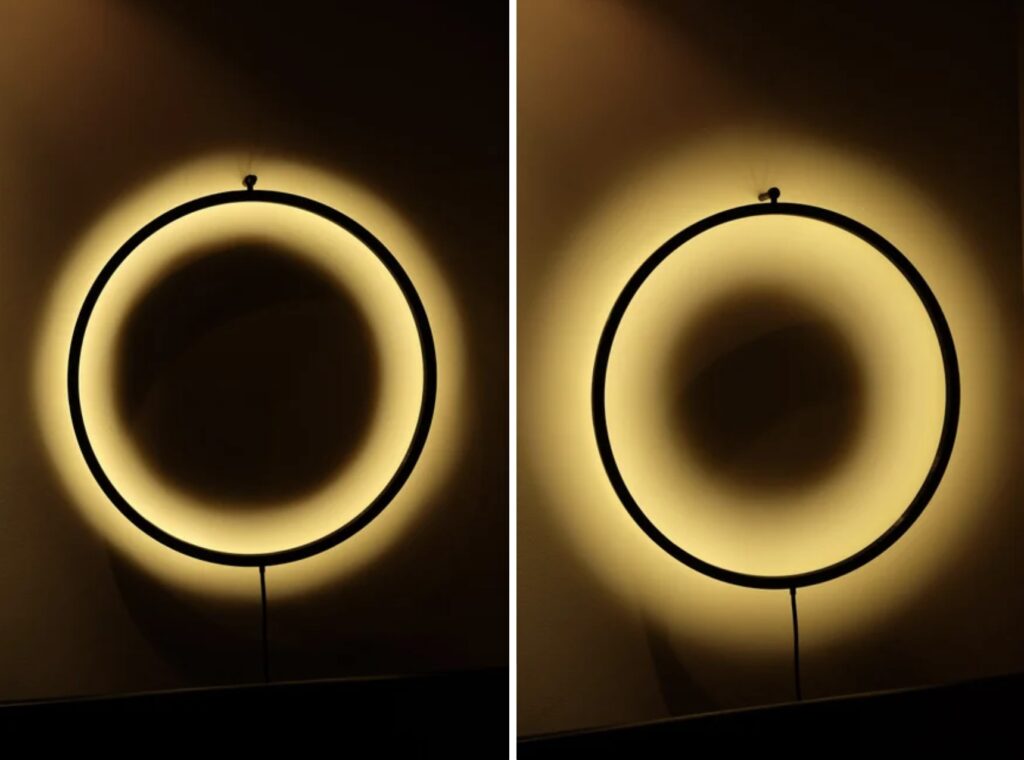
Have you ever exited a dark movie theater in the middle of the afternoon and found yourself blinded by the sudden transition to bright sunlight? Etienne Leroy faces the same problem after watching a movie on his home projector and turning on the lights. Because those lights are intense and instantly come on at full brightness, the transition can be very harsh. To increase comfort, he designed a ring-shaped lamp that lightens progressively.
ECLIPSE is a ring-shaped lamp that shines its light upon the wall onto which it is mounted. When activated, it gradually increased the brightness of the light in order to avoid a jarring transition after movie time. There are no longer any worries about hurt eyes and the lamp looks gorgeous, so it adds to the home’s decor instead of detracting from it. Best of all, ECLIPSE is easy and affordable to build if you want your own.
The lamp’s frame is printable in small sections that should fit on most consumer 3D printers. Illumination comes from a strip of “warm white” LEDs, though it would be easy to substitute another color or even RGB LEDs. An Arduino Nano controls those LEDs, increasing brightness slowly over a set period of time. It uses an infrared receiver module, so users can take advantage of the remotes they already own and have handy to turn the ECLIPSE lamp on. It will work with any infrared remote and the user only needs to decode the specific code sent by their remote when they press the desired button.